
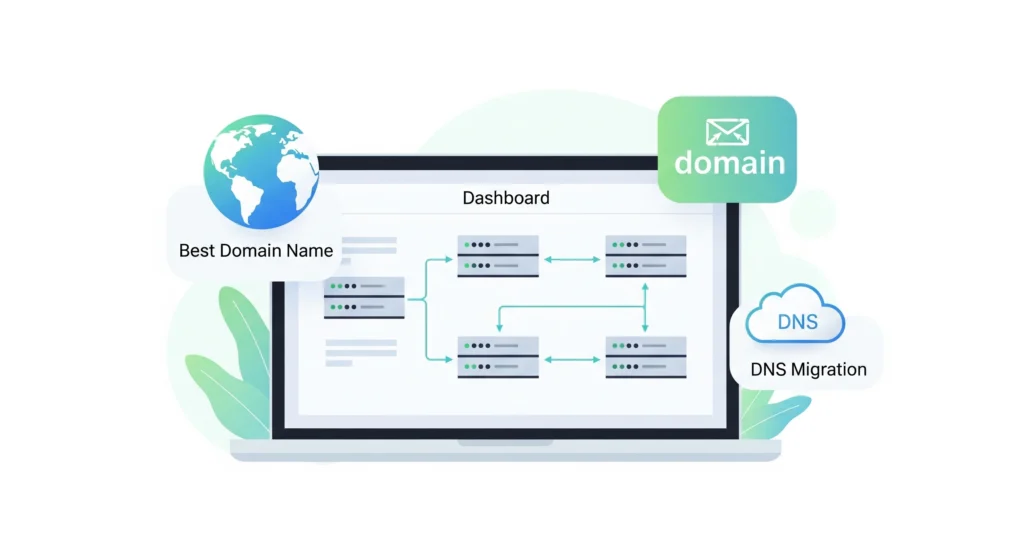
When you migrate your website from one server or provider to another, the internet must know where to locate it. This is accomplished via a technology known as DNS, or Domain Name System. DNS functions similarly to the Internet’s address book. If it is not correctly updated, your website or emails may cease to function.
Many businesses and website owners in India make minor errors while changing their DNS. These mistakes may appear minor at first, but they can cause significant difficulties such as website outages, email troubles, traffic loss, and even a decline in search rankings. Because even a few minutes of downtime can have a negative impact on sales and customer trust, DNS transfer must be handled with caution.
In this article, we’ll go over the most frequent DNS migration mistakes to avoid, recommended practices to follow, and a step-by-step checklist to help you transfer your DNS easily and without issues.
What is DNS Migration?
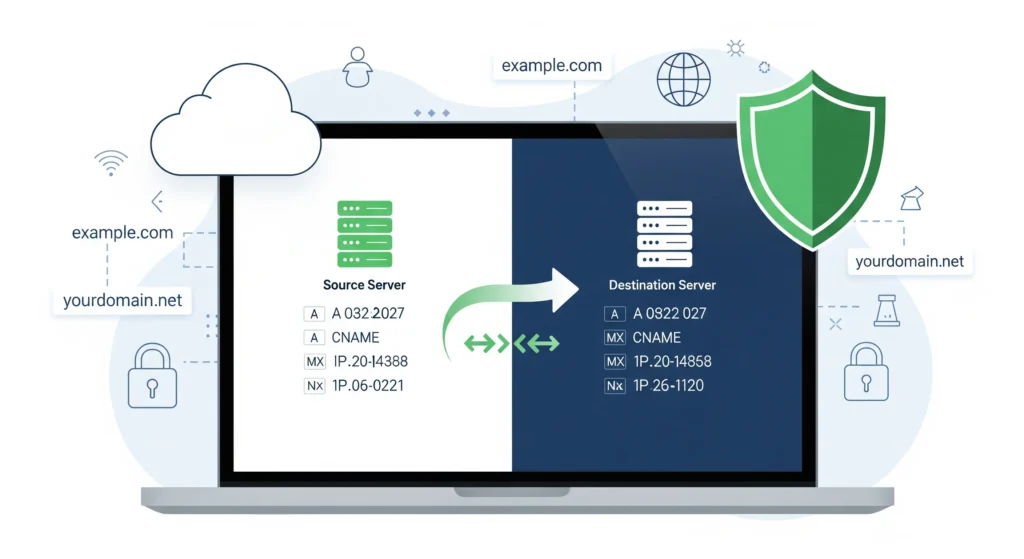
DNS migration simply means shifting your domain’s DNS settings from one provider to another. For example, if your website was hosted with one company and now you are moving it to another hosting provider, you also need to move your DNS records.
Some common reasons for DNS migration are:
- Changing your hosting provider
- Moving to a faster DNS service like Cloudflare or Google DNS
- Shifting to a registrar that offers better pricing or features
- Business growth requires stronger DNS security services
While this sounds simple, the process is very sensitive. If you make even a small mistake, your website might not open for users, or emails may bounce back.
Why DNS Migration Mistakes Can Be Costly
If DNS migration is not handled properly, it can lead to serious issues:
- Website Downtime: Your website may stop working for hours or even days.
- Loss of Traffic: Users who cannot access your site will go to competitors.
- Email Issues: Forgetting email records (MX) can block all business emails.
- SEO Impact: Search engines may mark your website as unavailable.
- Customer Trust: Repeated downtime creates a poor impression.
For example, Google studies show that even a 2-second delay in page load can increase bounce rates by more than 30%. So, downtime during migration can directly affect revenue.
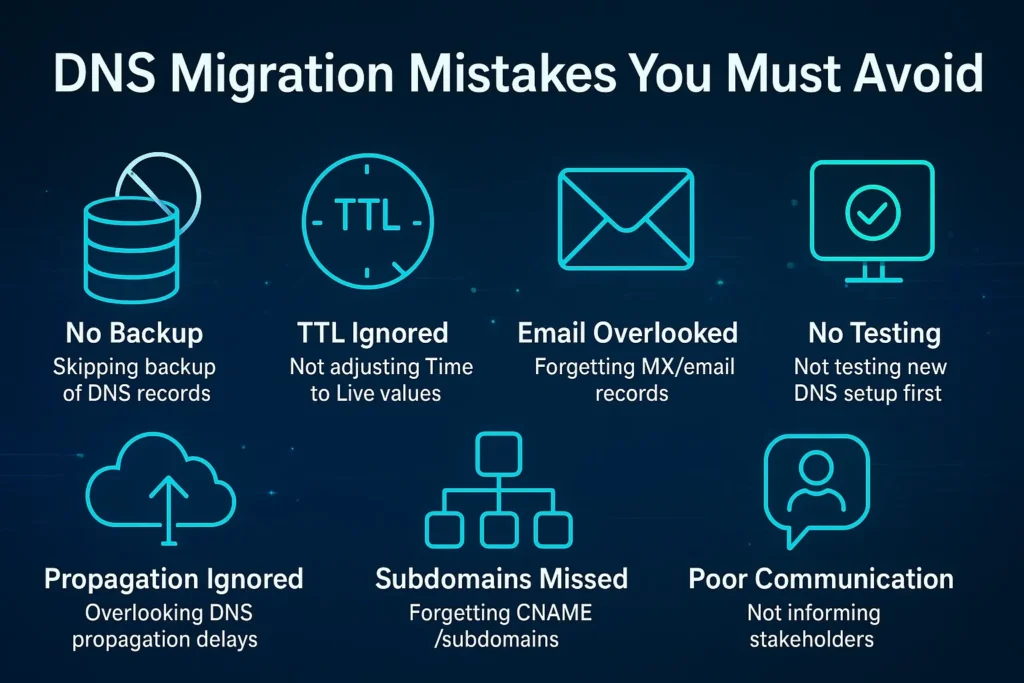
DNS Migration Mistakes You Must Avoid
Now let’s look at the most common mistakes people make during DNS migration and how you can avoid them.
1: Not Backing Up DNS Records Before Migration
One of the most common mistakes people make is starting migration without keeping a copy of the old DNS settings. These records contain your website IP, email routes, subdomains, and other important details. If something goes wrong, and you don’t have a backup, your website or emails may stop working. In many cases, businesses spend hours guessing what the old records were, which creates stress and loss of customers. A simple backup could have avoided all this trouble.
How to Avoid:
- Export all DNS records from your old provider.
- Download the full zone file (if available).
- Take screenshots as an extra safety step.
- Store the backup in a safe and easy-to-access place.
2: Forgetting TTL (Time to Live) Adjustments
TTL decides how long internet servers remember your DNS information. If you keep the default high TTL during migration, your changes will take longer to show up. This means some users may still reach the old server while others reach the new one, causing confusion. People often think migration failed when the real reason is delayed propagation. Not lowering TTL can easily extend downtime and frustrate both businesses and users.
How to Avoid:
- Lower TTL to a small value (like 300 seconds) before migration.
- Make the change at least 24–48 hours before the switch.
- Apply TTL changes for all record types (A, MX, CNAME, TXT).
- After migration is stable, increase TTL back to normal.
3: Overlooking MX and Email Records
When moving DNS, many people only focus on website-related records and forget about emails. MX records, along with SPF, DKIM, and DMARC, control how your emails are delivered. If you don’t migrate them correctly, your emails may stop working or land in spam folders. In India, where email is the main way of doing business, this can cause missed orders, unhappy clients, and even loss of revenue.
How to Avoid:
- Copy all MX records carefully into the new DNS.
- Add SPF, DKIM, and DMARC records exactly as required.
- Test email sending and receiving after migration.
- If using Google Workspace or Microsoft 365, follow their setup guide.
4: Not Testing the New DNS Setup Before Switching
Some website owners switch DNS directly without testing. This is risky because small mistakes may remain hidden until the site goes live. For example, a missing subdomain or a wrong IP address may break your site or emails. Without testing, you won’t know the issue until customers complain. Proper testing helps you fix problems before they affect your business.
How to Avoid:
- Use tools like DNSChecker, IntoDNS, or Dig to test the new records.
- Check if the new server is resolving the website correctly.
- Test all subdomains and emails on the new setup.
- Fix errors before making the final switch.
5: Ignoring DNS Propagation Time
DNS changes don’t update everywhere instantly. It usually takes 24–48 hours for changes to spread across the internet. Many people forget this and panic when their site doesn’t load right away. Some users may see the old server while others see the new one during this time. Not understanding propagation time creates confusion and unnecessary stress.
How to Avoid:
- Plan migration with the 24–48 hour delay in mind.
- Inform your team and clients about possible downtime.
- Avoid announcing the migration as “complete” until fully propagated.
- Monitor traffic during the propagation period.
6: Forgetting About Subdomains and CNAME Records
Websites often have subdomains like blog.example.com or shop.example.com. During migration, people sometimes focus only on the main site and forget these subdomains. This can break important parts of your website or apps. Missing CNAME records may also disconnect services like payment gateways, email marketing, or analytics.
How to Avoid:
- Make a list of all subdomains before migration.
- Copy every CNAME record to the new DNS.
- Double-check services like blogs, shops, or apps after migration.
- Test each subdomain separately to confirm it works.
7: Poor Communication with Stakeholders
Another mistake is not informing everyone involved about the migration. If the IT team, marketing team, or clients don’t know about it, they may think something is broken when the site is down. This leads to confusion, complaints, and loss of trust. Proper communication helps everyone prepare for small issues that may happen during migration.
How to Avoid:
- Inform all teams (IT, marketing, sales) before migration.
- Update clients if there may be downtime.
- Share the migration timeline and expected effects.
- Keep support staff ready to handle issues quickly.
8: Rushing the Migration During Peak Hours
Many businesses make the mistake of migrating during office hours or sales campaigns. If something goes wrong, it directly affects customers and sales. Doing migration in peak hours increases risk and pressure on the team. The best time is when website traffic is lowest so fewer people are affected if an issue occurs.
How to Avoid:
- Always plan migration during off-peak hours (like late night).
- If your business is global, choose the least busy time zone.
- Avoid weekends if your site gets high weekend traffic
- Keep a rollback plan ready in case issues occur.
Suggested Read: Best Content Monetization Tools
DNS Migration Best Practices
Here are some tips to make your DNS migration smoother:
Take a backup of all DNS records
Before you change anything, save a copy of your current DNS records. If something goes wrong, you can use this backup to fix things quickly.
Lower TTL before the migration
TTL means how long servers remember your DNS. If you make it short (like 5 minutes), changes will update faster when you move.
Test everything in a staging environment first
Do not test on your live website. First, check on a test setup to be sure all emails, websites, and services are working.
Communicate with your team and clients
Tell your team and clients about the migration in advance. This way, they know what’s happening and are ready if there are small issues.
Monitor traffic and logs after migration
After the move, keep checking your website, emails, and logs. If there is any problem, you will see it quickly and can fix it.
Keep old DNS records active for a few days as a safety net
Don’t remove the old records right away. Keep them for a few days so people who still have old data can connect without trouble.
DNS Migration Checklist
Here’s a simple checklist you can use before starting migration:
- Export and save all DNS records.
- Lower TTL to 300 seconds.
- Prepare a new DNS with all records.
- Test the new DNS using tools.
- Schedule migration during off-peak hours.
- Inform all stakeholders.
- Monitor logs after the switch.
- Keep backup DNS live for 2–3 days.
Tools to Help with DNS Migration
These tools can make migration easier:
DNSMadeEasy
DNSMadeEasy is a reliable managed DNS service offering global DNS management, monitoring, and automated failover. It ensures uptime, performance, and business continuity by rerouting traffic during server failures or outages.
Cloudflare DNS
Cloudflare DNS is a fast and secure DNS provider offering global speed, protection against DDoS attacks, DNSSEC support, and a free plan. It improves website reliability, security, and performance.
DNSChecker
DNSChecker is an online tool that checks DNS propagation across global servers. It helps confirm whether recent DNS changes are reflected worldwide, making it essential for smooth DNS migration and troubleshooting.
IntoDNS
IntoDNS analyzes DNS configurations and reports errors, warnings, and optimizations. It checks delegations, records, and server health, helping administrators identify misconfigurations and improve DNS performance during or after migration.
Dig (command-line tool)
Dig is a command-line DNS lookup utility used to query and verify DNS records. It provides detailed diagnostics for A, MX, CNAME, TXT, and other records, ensuring accurate DNS resolution.
Conclusion
DNS migration is like changing the address of your shop. If you don’t update it properly, customers will not be able to find you. The process looks simple, but a single mistake can cause downtime, email loss, and business disruption. These common DNS Migration Mistakes are often overlooked, yet they can have major consequences for your website and business continuity.
By avoiding the mistakes listed above and following the best practices, you can make the migration process smooth and safe. Always back up your records, test before going live, and communicate with your team. With the right planning, DNS migration can be quick, safe, and stress-free.
FAQs
Q1. How long does DNS migration take?
It usually takes a few minutes, but global propagation can take up to 48 hours.
Q2. Will DNS migration affect my SEO?
If done properly, SEO is not affected. But downtime can harm rankings.
Q3. What is the safest time to migrate DNS?
Late night or weekends when traffic is lowest.
Q4. Can I reverse DNS migration if something goes wrong?
Yes, if you have a backup of old DNS records.
Q5. Do I need technical knowledge for DNS migration?
Basic knowledge is enough, but for complex websites, expert help is recommended.